• Disclaimer

    Disclaimer: wireless-extender-setups provides assistance for various issues related to Range extenders and wifi devices on this website. We have no direct or indirect alliance with any third-party organization. Any image, brand name, products, trademarks and logo used is for referential purpose only.

  • Netgear Nighthawk X4 AC 2200 Setup

    Complete Guide on Netgear Nighthawk X4 AC 2200 Setup


    The Netgear Nighthawk X4 AC2200 Setup provides 2Gbps WiFi speed and boosts the existing WiFi range. With this extender device, you can create a more robust WiFi network at home. The Netgear nighthawk X4 AC2200 is the most effective way to extend the WiFi range of your router. Thanks to its improved wireless coverage and signal strength, you can enjoy online streaming without buffering. Here we can check the process of the Netgear Nighthawk X4 AC2200 Setup.

    You can use the three methods for the Netgear Nighthawk X4 AC2200 setup, such as Netgear installation assistant, WPS button, and Fastlane technology. In this article, we can discuss three methods in detail.


    Netgear Nighthawk X4 AC2200 Setup By Using Netgear Installation Assistant


    Here we can discuss the Netgear installation assistant for the Netgear Nighthawk X4 AC2200 setup. Let’s start!


    • Turn on your Netgear nighthawk X4 AC 2200 extender by connecting it to the power socket. 
    • Your extender is now placed closer to your wireless router.
    • There is a need to plug your Netgear extender into a power outlet.
    • Here you can wait for seconds until the extender LED lights turn to light green. 
    • There is a need to attach the Netgear X4 AC2200 extender to the router. 
    • It is vital to open the web browser in your system and enter www.mywifiext.net in the address bar of your favorite browser. 
    • You can now see the Netgear installation assistant appears on the screen.
    • Here it is crucial to follow all the on-screen instructions and attach your Netgear extender to the existing network. 
    • After this, you can place your Netgear X4 AC 2200 extender in the best location.
    • When you still have a poor or weak WiFi connection, move your extender closer to your router and try again until you see the Link status LED light turn white.
    • Connect the client devices to the extended wireless network once you have located the best location for the extender.


    It is also imperative to place your Netgear X4 AC2200 extender at the best location so devices will get a proper network. There is also a need to follow all steps accordingly for the Netgear Nighthawk X4 AC2200 setup. 


    Netgear Nighthawk X4 AC2200 Setup By Using WPS Button


    You can use the WPS button for the Netgear Nighthawk X4 AC2200 setup. There is a need to read and follow all steps perfectly.


    • First of all, you need to turn on the Netgear Nighthawk X4 AC2200 extender.
    • It is also crucial to place your extender near the router in the same place.
    • Once you have plugged your extender into the power socket, wait for a few minutes until the power LED light on the extender turns green.
    • Here you press the WPS button on your extender.
    • The white LED light on the Netgear nighthawk x4 ac2200 extender indicates a good connection between the extender and router. 
    •  You can move your Netgear extender to a new location.
    •  Go to the location where there is poor or weak WiFi coverage with any WiFi-enabled device. 


    It is vital to use the above steps for the Netgear Nighthawk X4 AC2200 setup.


    Netgear Nighthawk X4 AC2200 Setup By Using FastLane Technology 


    With FastLane technology, you can enjoy maximum WiFi performance. A dedicated band connects the WiFi router to the X4 AC2200 extender, and a second band connects the WiFi device to the extender. You can use the FastLane technology for the Netgear Nighthawk X4 AC2200 setup. You can check these steps and follow them properly. 


    • First, there is a need to attach your router to Netgear Nighthawk X4 AC 2200 extender.
    • You can use any internet browser you like, such as Internet Explorer, Google Chrome, or Microsoft Edge. Use the latest version of the internet browser you are using. 
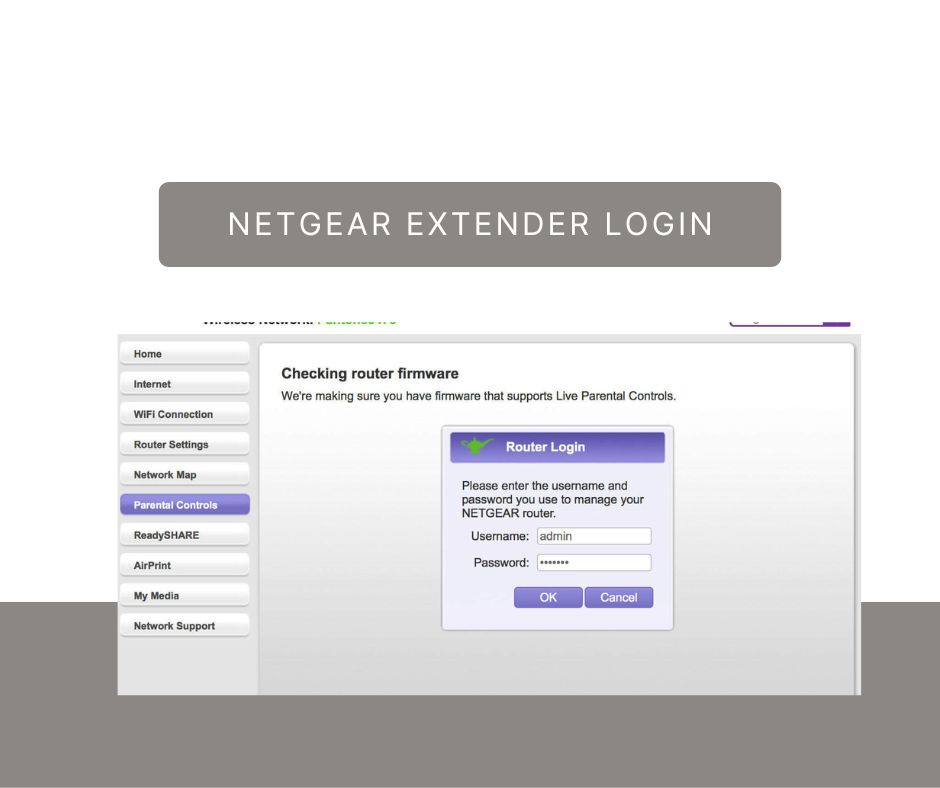
    • Here you can enter mywifiext.net in the URL bar of your web browser.
    • When the login page appears, input your username and password in the correct areas. 
    • Now tap on the login button.
    • Once the Netgear Genie web page appears, tap “Do More” and then “FastLane”.
    • There are two options for users.
    • In the first option, the device is connected to the extender at 2.4 GHz, while in the second option, it is connected to the extender at 5 GHz, and the extender is connected to the router at 2.4 GHz. 
    • You can choose according to your preference.
    • Here you hit the button and save it.


    Final Words 


    You can use any method from the three methods and start the process of the Netgear Nighthawk X4 AC2200 setup. It depends on the user’s preference that they want to prefer to use. Sometimes there is no WPS button on your router so there is a need to use another method. It is also crucial to place your extender in the best location so it easily connects with the router.


    how to connect wifi extender to router without wps

    How to Connect Wifi Extender to Router Without WPS?

    Netgear Extender is easy to use and comes with many modern features. There are various ways how to connect wifi extender to the router so you can use their setup it. You can use the WPS button to set up the extender. Devices connected through WPS are easily and quickly connected to your network. Your network may be vulnerable to attacks if you use this feature.


    There is also an option for users to how to connect wifi extender to router without WPS. Sometimes your router comes with a WPS button so you can use this method to connect with the router.


    Netgear Extender Login


    Method To Connect WIFI Extender To Router Without WPS 


    The process of connecting your wifi extender without using WPS may be a little more complicated, but it is still perfectly convenient. Knowing your router’s IP address will allow you to connect your wifi extender without using WPS. It is possible to find this information by logging into the router’s admin panel or reading its manual. 


    A PC can manage the settings of your extender rather than via the WPS button. You can also use two methods to attach the Netgear extender to your PC.


    • Wireless Connection 


    Through wireless service, you can manage the extender through your computer. You will need either wireless software or a wireless key to accomplish this.  


    • Cable Connection


    The old-fashioned way to connect is with an Ethernet cable if wireless doesn’t work for you. Using the in-built ports on your PC and extender, you can connect the extender directly to your PC. 


    Both methods are easy to use but you can use the Ethernet cable method because it is the second method there is a chance of internet outrage. It is also important to use the original Ethernet cable with your Netgear extender.


    You can easily attach your Netgear wifi extender to the router without WPS. It is also imperative to follow all the steps properly. Let us check these important steps here.


    Place the Extender Near the Device 


    Users must place their Netgear extender in the right place. You can place it near the router and your PC so it becomes easy to attach them wirelessly. It is also necessary for users to avoid places near Bluetooth speakers or microwaves or ovens and many other things that block their signals. 


    Connect To Your Wifi Extender

    Turn on your wifi extender by connecting it to a power outlet. 


    Attach Your Device With a Wifi Extender


    Connect your computer or mobile device to the wifi network that the wifi extender creates once it is powered on. You can give the name to this network such as “NETGEAR_EXT”. 


    Open Your Router Admin Interface


    The next step is to open a web browser and navigate to the address bar. You can enter “http://www.routerlogin.net” or 192.168.1.250 in the address bar. Now press Enter.


    Enter The Login Credentials


    It is also necessary to enter accurate login credentials, such as username and password. Most of the time username is an admin and a password is a password in most routers.


    Tap On Add Wifi Extender 


    After logging in, you will be taken to the router’s web interface. In this section, you can add a new wifi extender. There may be an option called “Wireless Settings” or “Network Settings”.  


    Enter Wifi Extender Details


    Enter your wifi extender’s name and password once you’ve located the correct section. You will now be able to connect your wifi extender to your router.  


    These are the basic steps for how to connect wifi extender to router without WPS. 


    Final Words 


    It depends on users and their router which method they want to use for how to connect wifi extender to router without WPS. There is a need to enter all the details properly so you can quickly connect the router with your Netgear extender. It is also vital to follow all the instructions properly and start using the Netgear extender. 

    Netgear AC1750 WIFI Mesh Extender Setup

    Netgear AC1750 WIFI Mesh Extender Setup

    Netgear AC 1750 extender has many advanced features, so you can easily use them. It is best for gaming and watching HD videos. Netgear AC1750 wifi mesh extender setup requires connecting your home router to the extender. It also removes all the dead points from your location. Whenever you buy a brand new Netgear AC1750 extender, a manual will be included. The Netgear AC1750 Manual contains step-by-step instructions for setting up the device. Within minutes, you’ll be able to set up your NetgearAC1750 extender setup and start using them. 


    There are three ways to set up a Netgear AC1750 extender. Users need to read all the instructions properly from the manual so they can quickly start the Netgear AC1750 wifi mesh extender setup process. Here we discuss the different methods for the setup of the Netgear AC1750 extender.


    Netgear AC1750 Extender Setup Using WPS Method

    You can use the WPS button for the Netgear AC1750 wifi mesh extender setup. Users need to follow all steps properly and start the setup process. You can check these steps : 


    • First, you can unbox your Netgear AC1750 extender.
    • Now you can power on your Netgear AC1750 extender.
    • It is important to place your extender near the router and in the same place. 
    • After this, you can attach your extender to a power outlet and turn it on.
    • Here you can wait until the power LED light turns green.
    • Now you can press the WPS button on the extender. If the Netgear AC1750 status LED light is white, it means the connection between the router and extender is good.
    • After this, you can move your AC1750 extender to the best location.
    • Go to a location with poor WiFi coverage with a computer or a WiFi-enabled mobile device.
    • WiFi-enabled computers and mobile devices can be connected to the extended network.


    These are the necessary steps for the Netgear AC1750 wifi mesh extender setup.


    Netgear AC1750 Extender Setup By Using Netgear Installation Assistant


    You can use the Netgear installation assistant for the Netgear AC1750 WiFi mesh extender setup. Let us check these steps.


    • You need to turn on your Netgear AC1750 extender.
    • Your WiFi extender can be placed close to your router.
    • Connect the extender to an electrical outlet after that.
    • When the Power LED lights up green, you are ready to proceed.
    • You can attach a router to the Netgear AC1750 mesh wifi extender.
    • Here you can open your favorite web browser on your device.
    • Now you can enter www.mywifiext.net. 
    • After this Netgear installation assistant starts showing.
    • You can follow all the instructions and attach your extender to your wifi network.
    • Here you can move your extender to a suitable place.
    • Move the extender closer to your router if you do not get a connection or a poor connection. Try again until the Link Status LED lights are all white.
    •  You can connect your client devices to the extended WiFi network once you’ve located the best location for your extender.


    After the Netgear AC1750 extender setup, you can use your extender properly. There is a need to log in to the extender.


    Netgear AC1750 Extender Setup by Using Fastlane Technology 


    You can enjoy maximum WiFi performance with FastLane Technology. With a dedicated WiFi band for connecting your router to the extender and another band for connecting your WiFi device to the extender, this extender offers high-speed WiFi connections. You can configure FastLane Technology after the Netgear AC1750 extender setup as AC1750 has a dual-band. 


    • First, there is a need to attach your router with a Netgear AC1750 mesh wifi extender.
    • You can open the web browser and enter mywifiext.net in the address bar.
    • Now you can press enter key.
    • Here you can see the login window and enter your username and password.
    • You can access FastLane by clicking on ‘Do More’ on the Netgear Genie page.
    • The device-to-extender option is now limited to 2.4 GHz and extender-to-router is limited to 5 GHz, and the extender-to-router option is restricted to 2.4 GHz.
    • You can choose any option you prefer and save it.

    After completing the Netgear AC1750 WiFi mesh extender setup process you can use start using the extender.


    Wrapping Up

    You can use the above method for the Netgear AC1750 wifi mesh extender setup. It is also important for users to place their extender near the router so it various devices can get proper network.

    Netgear AC1200 WiFi Range Extender Setup

    Netgear AC1200 WiFi Range Extender Setup

    Netgear’s AC1200 is a smart WiFi extender that boosts your existing WiFi range up to 1200 Mbps. The Netgear AC1200 extender delivers up to 1200 Mbps WiFi speed thanks to AC dual-band WiFi. It is compatible with most standard wireless routers. You can extend the range of your WiFi signal by connecting the device to your existing network using the 2.4 GHz and 5 GHz frequencies. Although Netgear AC1200 wifi range extender setup is not difficult, many users find it challenging to set up the AC1200. Here we can discuss the different ways to set up the AC1200 wifi range extender.


    Methods for Netgear AC1200 WIFI Range Extender Setup

    A Netgear WiFi range extender creates a Fastlane connection to your current router or WiFi modem. Unlike regular WiFi extenders, this dedicated connection increases internet speed and reliability. It also enhances the performance of the WiFi network as a whole. You can use these two methods for the Netgear AC1200 wifi range extender setup. Most of the time it depends on the users which method they want to adopt from the WPS button or installation assistant. Let’s check both ways in detail.


    Netgear AC1200 WIFI Range Extender Manual Setup


    You can also use the Netgear AC1200 wifi range extender manual setup. In this process, you can use the Ethernet cable and start the process. Here, you can use the installation assistant for this process. 

    • First of all, you can place your Netgear AC1200 range extender in the same place near your existing router.
    • Now you can attach the AC1200 extender using the Ethernet cable with an existing router.
    • After this, you can plug it into the power source and turn it on.
    • You can open any device and attach it to the extender network.
    • Here you can open your web browsers such as Chrome, Safari, Firefox, and many others.
    • You can open the official page of the Netgear extender login.
    • Now you can enter mywifiext.net or IP address 192.168.1.250 in the address bar. 
    • It is necessary to enter accurate login credentials such as default username and password. 
    • Click on the ‘Advanced option’ and then ‘New Extender Setup’ once the login page opens.
    • After this Netgear installation assistant will appear. Now you can follow all the on-screen instructions.
    • You can enter security questions enter.
    • Now you can tap on Next.
    • Here you can select the Network Radio button (2.4GHz and 5GHz) and press Next.
    • In the next section, enter your existing Wi-Fi network password.
    • Here you can select the password & SSIDs for your Netgear AC1200 extender.
    • Now you can again press next.
    • You can connect your Netgear extender by clicking on Network wifi settings.
    • After this process of Netgear ac1200 wifi range extender manual setup is complete.

    You can now unplug the extender and place it anywhere in the house you prefer. Users need to place their extenders in the right location so all devices can get a strong network. A certain distance is kept between the extender and radioactive devices, such as microwaves, treadmills, washing machines, baby monitors, cordless phones, Bluetooth gadgets, and refrigerators.  


    Netgear AC1200 WIFI Range Extender Setup By WPS Method

    You can use the WPS button for the Netgear AC1200 wifi range extender setup. It is a simple process, and you can quickly complete it.


    • Extenders can be placed in the same place as WiFi routers.
    • Wait until your extender LEDs are stable after plugging it into an electrical outlet.
    • Press the WPS button on your extender until the WPS LED lights start blinking.
    • Once the WPS button appears on your router, tap it.
    • Move the extender halfway between your router and the area with a poor WiFi signal by unplugging it.
    • Wait until the Power LED lights up green after plugging the extender into an electrical outlet.
    •  You can use the same WiFi password you use for your WiFi router to connect to the newly installed Netgear AC1200 extender WiFi network on your computer.


    After the process of the Netgear AC1200 wifi range extender setup is complete you can quickly start using your Netgear AC1200 range extender.


    Wrap Up 

    You can use any method from the above and complete the process of Netgear AC1200 wifi range extender setup. There is a need to follow all the on-screen instructions so you can quickly complete the setup process. Both methods are simple and easy, but it is necessary to use one at a time.